Showing posts with label Stencil pastes. Show all posts

Saturday, 27 October 2018

Introducing ...... Scandinavian Christmas & Christmas Folk Snowflake stencils along with NEW Simply Said Blocks - Christmas

Happy weekend! ......

More NEW products from the Uniko range to tempt you with this morning.  It's stencils this time, two brand new designs ....... Scandinavian Christmas, a pretty design filled with traditional Christmas images.  Use it whole to create a fabulous background, or just use part of it to decorate baubles or Christmas trees for example (the poinsettia on here is just gorgeous!)

We've also got the beautiful Christmas Folk Snowflake ...... another pretty all over design that can be used as is, or chop it down and just use part of it.

There's also a great little sentiment stamp set ....... Simply Said Blocks - Christmas.  I love this range, they are so useful, and this new set is full of festive sayings, perfect for all those Christmas cards.


Now for some inspiration .......  I don't know about you but, not only did I see a snowflake design in the new Christmas Folk Snowflake stencil, but I saw a pretty poinsettia too.  It's great when products have multiple uses ...... it's what I call value for money!


I used white stencil paste through the design and sprinkled over with red glitter whilst the paste was still wet.


I cut it down to fit on the front of a 6x6 inch card blank (with a bit of matting and layering) and I added a dot of gold glitter glue to each of the 'poinsettia' centres.


One of the Simply Said Blocks stamped in gold ink was perfect for my sentiment, and I added a little twist of gold thread behind.

Scandinavian Christmas .........


Just look at all those cute little images ..... add a touch of sparkle to them with some crystal glitter


and of course, those Simply Said Blocks go so well too .......


Thanks for popping by today .... I hope you're enjoying seeing the new release.  Got any favourites yet?

There's still more to come ........ check out the Uniko Blog each day until the big release on Tuesday next week. You'll find links to all the Design Team blogs on there too, for more ideas and inspiration.

Have a great weekend.  The sun is shining here this morning .... looks a little chilly out there though.
Time to dig out the gloves and boots I think.

Cheerio until next time .......
PS ..... if you're in the UK, don't forget to put your clocks back tonight! 

Monday, 15 October 2018

Book the sofa, grab the remote ..... Lucy's back on our screens

Happy Monday ......

A busy week coming up.  I thought I'd start it by letting you know that the lovely Lucy and Sweet Poppy Stencils are back on our TV screens this week ..... yeah!! 
Put the date in your diaries, book the sofa and the remote control, or set your box to record.

When? ...... Thursday October 18th 
What time? ...... 12pm and again at 4pm
Where? ....... HOCHANDA (Sky channel 673/Freeview 85/Freesat 817)

There's some brand new stencils, designed by the fabulous Tracey Dutton from Lavinia Stamps, all with dies to match.  And of course, all the other fab Sweet Poppy products will be available ..... pastes, glitters, stamps.

Here's a little look at a few of the samples I sent off to Lucy last week.
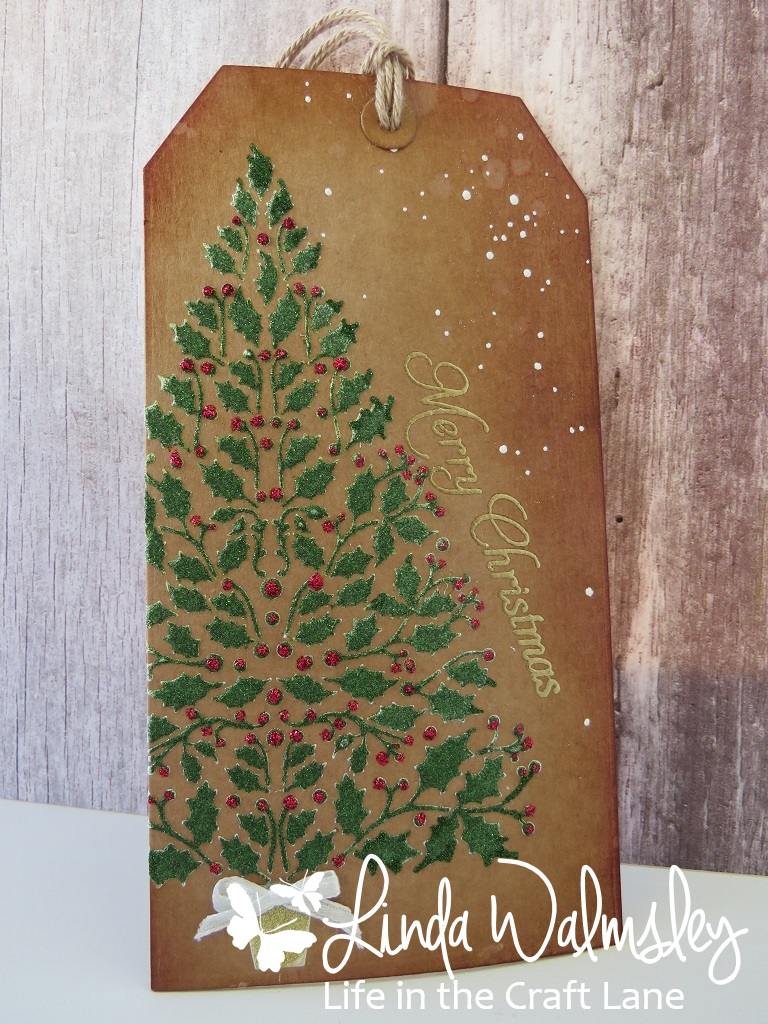
There's a little bit of Christmas ....... with the beautiful Holly Tree


A gorgeous Christmas tree, so full of detail.  Looks stunning in classic black and white .......


This is simply glossy white stencil paste, sprinkled with crystal glitter and finished off with a sentiment heat embossed on the bottom.


It's perfect for CAS Christmas cards ......


I added a pretty ribbon bow to decorate the tub .......


And why not make your gift tags too .....


Glossy white paste again with green glitter this time, and a touch of red for the berries .... very festive


Use the stencil with your inks too, to create fab backgrounds ......


The perfect backdrop for all your festive sentiments ...... 


All the sentiments used above are from the Sweet Poppy stamp sets .... Noel and Joy and Peace

It's not going to be all Christmas designs though ....... there's some gorgeous new foliage.
There's a pretty Large Fern ....... great detail on this 


Looks great over all those inky backgrounds.
And the matching die is fab ...... cut's beautifully too!


I've simply cut the ferns from plain cardstock and then heat embossed them with various metallic powders ...... very Autumnal!


One of my favourites from the new designs is the Forest Stem ..... how pretty is this, it's so delicate


I've used the stencil onto my inky background with a green Distress Oxide ink  (the stamp that I've also used is from the Sweet Poppy Stamp set ..... Season,  stamped, second generation using a Sepia Versafine ink)


I've then used paste through the stencil onto black cardstock, added glitters over the top and used the matching die to cut it out ......


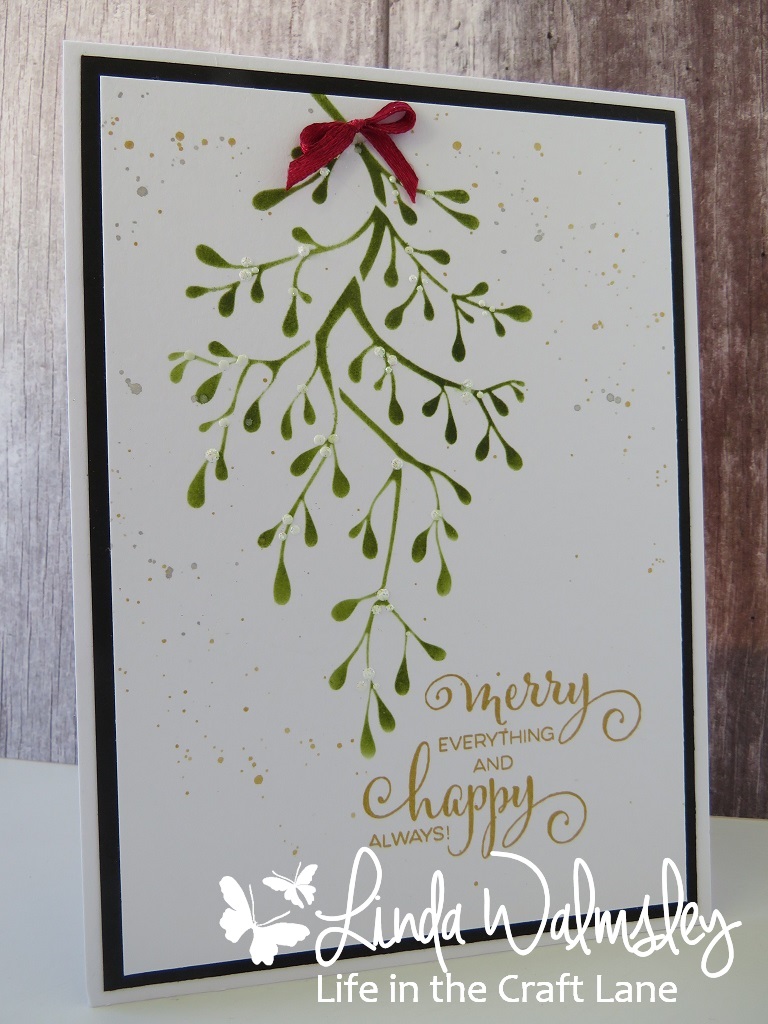
When I first saw this design, I must admit I immediately thought ..... mistletoe!!  I think it's perfect.


Distress Oxide ink ...... white enamel accents for the berries (you could use tiny pearls or even Liquid Pearls) 


A touch of gold and silver splattered in the background, and a festive ribbon bow 


Finished with a sentiment ..... love it!!!


Maybe it's just me but ..... I also saw a Christmas tree too ....


I think I'm getting in the festive groove now don't you ...... that's one excuse I suppose!  I can't blame the Christmas spirit yet ..... Sober October continues!!! (only 16 days to go)

Thanks for popping by .... enjoy the rest of your day. 
There's a couple more designs to show you but I'll leave those for a little later in the week.

Cherrio until next time .....

Sunday, 10 September 2017

CAS Mix Up ......

Happy Sunday folks ........

I hope you're enjoying the weekend.

I'm playing along with this month's CAS Mix Up Challenge today ........


And ..... this is also a sneaky peek at one of the stencil designs from the Sweet Poppy Stencil show, coming up next week on Hochanda.  Lucy's back on our TV screens with some gorgeous new designs, and some back in stocks ....... I'll give you all the show times etc., later in the week.

This wasn't done with the challenge in mind but, I think it fits the bill perfectly.  There's rubber stamping on there ..... a little bit of a watercolour wash in the background ..... and my choice element is die cutting, or it could be stencils and texture paste, or even glitter.


I started off by adding a wash of colour onto a piece of white cardstock.  I used Aged Mahogany Distress ink, onto a craft mat then spritzed with some Perfect Pearls mica spray instead of just plain water. I then used a paintbrush to wash the colour over the card .....


I also added a few splatters of the ink on there too.
I'm not sure that the pretty pearlescent sheen from the mica spray comes across in the photos but trust me, it's there!

The greeting was then stamped and heat embossed in gold ..... this is one of my favourite Tim Holtz Christmas sentiments ..... I love the font


I then die cut the baubles .... two from snippets of plain white card and one from a piece of cardstock that I had stenciled using one of the Sweet Poppy designs ...... Holly Back Plate


This is a huge stencil ...... nearly 6 inches by a little over 7 and a half inches (145mm x 195mm) and it's perfect for creating backgrounds.  But .... just because it's a large stencil doesn't mean it's just for backgrounds, or for making large cards.  Why not use the stencil on a large piece of card and then use the card for lots of different projects.  Cut it into smaller pieces, use it with your punches or die cut it as I have here .....


I used the white glossy paste through the stencil then sprinkled over the top with green glitter.  Once the paste was dry I die cut the bauble and then added in the berries using some of the Nuvo Jewel Drops


The two smaller baubles were coloured using Distress ink and then I spritzed them with the Perfect Pearls.  I love the look this gave once the mica spray was dry.

The die cuts were then attached, the two smaller ones with glue, flat onto the card and the larger one with foam pads to add dimension.
I made the baubles look as if they were hanging by drawing in the 'chain' using a silver gel pen .....


A few tiny gemstones and a silver twine bow add the finishing touches to the baubles, and I fussy cut one of the stenciled sprigs of holly to add a bit more interest to the sentiment ......


I'll show you a few more ideas for using this large stencil next week, along with a look at some more of the new designs that will be on the show ........ there's definitely a festive feel.


Thanks for popping by ..... enjoy the rest of your weekend.
I'll be back again later .... there's one more Blog Challenge to get underway for September.  Do you like ATC's???

Cheerio until then .....

Wednesday, 9 August 2017

Book the sofa ...... grab the remote control ...... Sweet Poppy are back on the TV

Happy Wednesday ........

What's everyone up to this week? I hope you're having a good one.

I just want to give you a quick reminder that the lovely Lucy Ellis and Sweet Poppy Stencils will be back on our TV screens again this week.
There'll be some brand new stencils ....... everyday designs and possibly a touch of dare I say it .....Christmas! along with some old favourites and back in stocks  There's some brand new products too ..... exciting stuff!  And, as always great tips and demonstrations from Lucy.
Book the sofa and the TV remote NOW!  Or ..... if you can't watch live, set the shows to record.
Friday August 11th ....... at 12 and 4pm ........ on Hochanda Sky Channel 663/Freeview 85/Freesat817

Here's a little look at one of the new designs that's on the show ....... the gorgeous Mehndi Flower ..... how pretty is this!


A great size too ...... use the whole design to create stunning cards.
Classic black and white for that elegant look........


Glossy black paste onto plain white cardstock ..... simple


With just a touch of gold embossing to make it extra special ......


A few tiny gemstones for added sparkle ...... and a bit of matting and layering to frame the image


 Here I've used the same stencil ..... but created a totally different look .....


Add a bit of colour to the background ..... I used Distress Inks simply brayered onto a piece of white card


White paste this time through the stencil, and one of the gorgeous fine glitters from Sweet Poppy sprinkled over the top whilst the paste is still wet.

I used the same paste and glitter for the Inspirational Word down the side too ......


The Sweet Poppy glitters are super fine and they sparkle beautifully .... and there's lots of beautiful colours to choose from too .... this one is Penny Copper


Don't just use your stencils for the focal point on your cards ...... create interesting backgrounds with them too .......


I've used just part of the Mehndi Flower randomly on the edges of the black layer of card, with the black paste, to add a bit more interest to my design .....


Use your stencils with your patterned papers .......


I did a workshop a few weeks ago using patterned papers ...... even the ones we didn't like!  This is another version of one of the cards we made
We all have patterned papers that we love .... and don't use!  We also have some designs that are not so well loved.  Don't just throw them out or leave them on the bottom of the pile ........ cover them up a little and change the look ......


Use pretty stencil designs, and add a bit of glitter ......


Throw in a bit of rubber stamping, a sentiment too ........


Ooooh .... have you spotted one of the brand new products there ....... look at the bottom of the sentiment banner .... tiny 3D cement balls.  How cute are those ..... and great for adding texture to your projects.
I simply used my finger to apply a little bit of glue to the edges of my card, sprinkled on the tiny balls and left them to dry.  Once they were dry I gently rubbed over the top with a little White Fire Treasure Gold ......


If you click on the pictures you'll be able to get a better look at them! I can't wait to have a proper play with these ...... most of my samples were finished when they arrived but I had to use them somewhere!!!

Thanks for popping by .... enjoy the rest of your day.
It's time I made a start on tonight's meal .... hubby will be home soon!
I'll be back tomorrow though with a few more ideas for using your Sweet Poppy Stencils ....... I think we'll go a little bit festive maybe.

Cheerio until next time ........