Showing posts with label Glitters. Show all posts

Wednesday, 7 November 2018

Tag number 2 for the 12 Tags event .......

Happy middle of the week .......

It's a wet and windy Wednesday here and I'm so glad I don't have to go anywhere. 
It's a craft room day for me ..... I need to pack a bag to take across with me on Friday.  That's if the boat goes on Friday, looking at the weather forecast, it's not good!!
I'm trying to stay positive though ..... this is the Isle of Man.  The weather changes by the hour here, you never know we could be basking in sunshine by the weekend ..... or not!!
No use worrying about it now though ..... we'll have to wait and see what Friday brings.

I've got another tag for the fun festive event that's happening right now.  Yes, it's 12 Tags of Christmas with Loll & Friends


Another CAS design for Tag number 2 .....


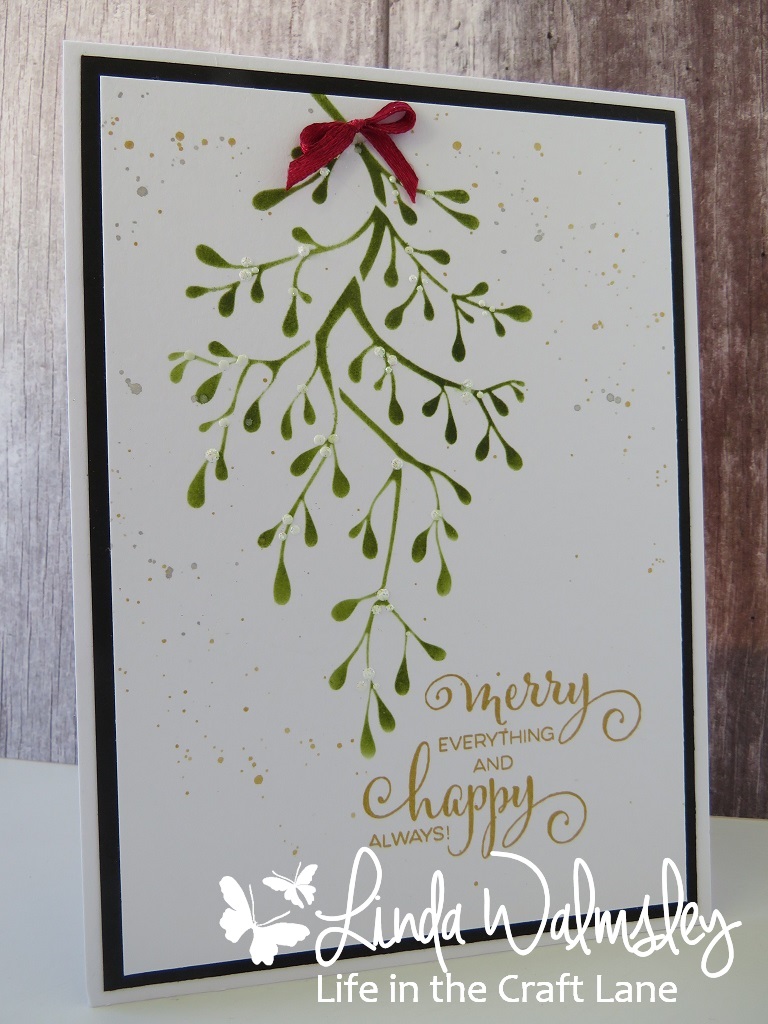
Inspired by yesterdays tags from Loll and Nancy, with the holly and the lovely poinsettia, I went for my favourite festive greenery ...... mistletoe,  using the pretty Mistletoe Wreath from Sweet Poppy Stencils.

I used Glossy White paste through the design, and then sprinkled green glitter over the top


Once the paste/glitter was dry I added in the berries using White Enamel Accents, and a few dots of Gold Glitter Glue here and there, for a little added sparkle.

I stamped my sentiment onto a snippet of white card and attached it on the bottom


And finished off with a festive red bow .....


I'm getting into the festive spirit now ......... no, I don't mean the gin! (Maybe later!)
Christmas cards are coming along nicely, I'm hoping to get those finished next week. I've made a start on the tags now, and the presents for them to go on.  Even the Christmas trees have made an appearance!  Don't worry I'm not feeling THAT festive just yet ...... there's a little while to go before they get decorated.
It's just they were in the garage all boxed up, and we had to move them to fit George in there. So I brought them into the house.  They can sit in the conservatory out of the way until December 1st.

Who's George? .......  And why is he in the garage? I hear you ask. 
Well ...... George is the cute little VW camper van that belongs to Robbie (Lauren's other half).  It's starting to get too cold and wet for him to be outside so he's spending the winter cosy and warm in our garage.


Thanks for popping by ..... enjoy the rest of your day.

Cheerio until next time .......
 

Tuesday, 30 October 2018

Today's the day .......... Release Day for the BRAND NEW Uniko stamps and stencils

Happy Tuesday ......

Yeah!! it's here ........ brand new Uniko Release Day .......  whoo hoo!!!!

I hope you've enjoyed the last few days when we've been introducing the four BRAND NEW stamp sets, along with two re-released ones, and the three BRAND NEW stencil designs. 
Well today, it's time for the New Release Blog Hop and GIVEAWAY.

Join in the fun with Bev and the Design Team and hop along with us.  There's an amazing prize up for grabs so don't forget to comment along the way.  You could win the entire new release .... yes all of it!  You have until midnight(GMT) on 9th November to play along, so plenty of time.

Here's a few more ideas for you using some of the new stamps and stencils .........

BIG & BOLD Merry stamp set with the Folk Snowflake stencil ........


Perfect Pearls Mist sprayed through the stencil onto black card.  The result was this gorgeous, shimmery background


The sentiment was then stamped over the top and heat embossed .... looks great!
The holly leaves are from the Uniko Winter Foliage set, stamped in Peeled Paint Distress Oxide and fussy cut.

Because my piece of black card was bigger than the stencil, I ended up with a border top and bottom of the design.  Instead of cutting it off, the piece fit perfectly on a DL card ..... I just needed to trim the sides away.  I added the decorative borders just to hide the rough edges ..... looks cute though I think!


BIG & BOLD Merry again, this time with the gorgeous Sweet Broom ......


A lovely layering stamp and looks so pretty whatever colours you use.  I've gone with gold embossing then added the detail to the leaves using a pretty pink metallic ink


The Quilted stencil next, along with the Santa from one of the re-released sets .... Jolly Christmas.  And not forgetting the new Simply Said Block - Christmas


I used two colours of ink with the stencil, first the green shade, then I moved the stencil to fill the empty squares and stenciled with red ink


One of the Background Builders next, the new Christmas 2018 set.  These are great for making quick and easy, fun designs


The sentiment is from the Uniko All Occasions Sentiments #4 ..... love this font!

Last up from me today is the Scandinavian Christmas stencil .....


I've used part of the design to decorate my Christmas tree.


Stencil paste with glitter on the top ......  and a snippet of card to make the base.


Well I hope you're feeling inspired, and that you love the new release as much as we, the Design Team do.

All the new stamps and stencils will be available on the Uniko website from 9pm this evening.  You'll have to hang on to your shopping lists for just a little while longer, but the good news is there's a 24hr FREE WORLDWIDE SHIPPING offer on all orders of £15 or over starting from 9pm this evening (Tuesday)  through until 9pm on October 31st.

Don't forget we're celebrating the new release with a Blog Hop and Giveaway.  All you have to do is leave comments as you visit each blog, and you could win the entire new release.
Happy hopping!
Linda (that's me!)
and


Thanks for popping by .... enjoy the rest of your day.
I'm off up to Ramsey this morning with Lauren and the little man.  My favourite shops are up there so this could be an expensive trip! No doubt it will cost me lunch too.

Cheerio until next time .......

Monday, 15 October 2018

Book the sofa, grab the remote ..... Lucy's back on our screens

Happy Monday ......

A busy week coming up.  I thought I'd start it by letting you know that the lovely Lucy and Sweet Poppy Stencils are back on our TV screens this week ..... yeah!! 
Put the date in your diaries, book the sofa and the remote control, or set your box to record.

When? ...... Thursday October 18th 
What time? ...... 12pm and again at 4pm
Where? ....... HOCHANDA (Sky channel 673/Freeview 85/Freesat 817)

There's some brand new stencils, designed by the fabulous Tracey Dutton from Lavinia Stamps, all with dies to match.  And of course, all the other fab Sweet Poppy products will be available ..... pastes, glitters, stamps.

Here's a little look at a few of the samples I sent off to Lucy last week.
There's a little bit of Christmas ....... with the beautiful Holly Tree


A gorgeous Christmas tree, so full of detail.  Looks stunning in classic black and white .......

This is simply glossy white stencil paste, sprinkled with crystal glitter and finished off with a sentiment heat embossed on the bottom.


It's perfect for CAS Christmas cards ......


I added a pretty ribbon bow to decorate the tub .......


And why not make your gift tags too .....


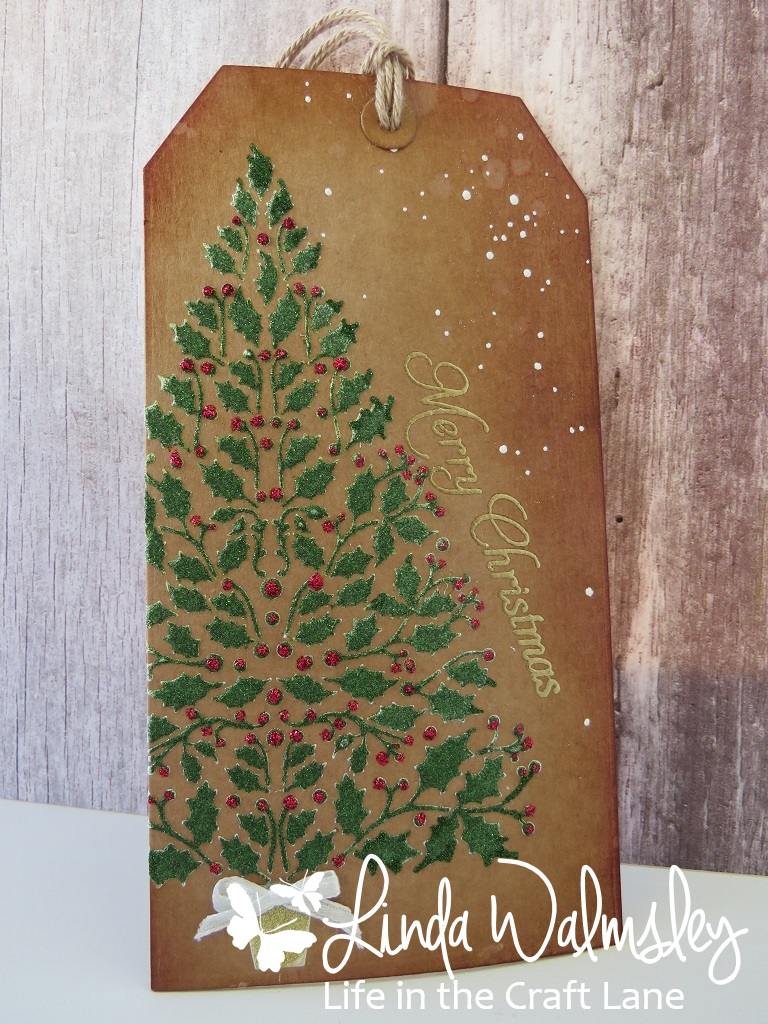
Glossy white paste again with green glitter this time, and a touch of red for the berries .... very festive


Use the stencil with your inks too, to create fab backgrounds ......


The perfect backdrop for all your festive sentiments ...... 


All the sentiments used above are from the Sweet Poppy stamp sets .... Noel and Joy and Peace

It's not going to be all Christmas designs though ....... there's some gorgeous new foliage.
There's a pretty Large Fern ....... great detail on this 


Looks great over all those inky backgrounds.
And the matching die is fab ...... cut's beautifully too!


I've simply cut the ferns from plain cardstock and then heat embossed them with various metallic powders ...... very Autumnal!


One of my favourites from the new designs is the Forest Stem ..... how pretty is this, it's so delicate


I've used the stencil onto my inky background with a green Distress Oxide ink  (the stamp that I've also used is from the Sweet Poppy Stamp set ..... Season,  stamped, second generation using a Sepia Versafine ink)


I've then used paste through the stencil onto black cardstock, added glitters over the top and used the matching die to cut it out ......


When I first saw this design, I must admit I immediately thought ..... mistletoe!!  I think it's perfect.


Distress Oxide ink ...... white enamel accents for the berries (you could use tiny pearls or even Liquid Pearls) 


A touch of gold and silver splattered in the background, and a festive ribbon bow 


Finished with a sentiment ..... love it!!!


Maybe it's just me but ..... I also saw a Christmas tree too ....


I think I'm getting in the festive groove now don't you ...... that's one excuse I suppose!  I can't blame the Christmas spirit yet ..... Sober October continues!!! (only 16 days to go)

Thanks for popping by .... enjoy the rest of your day. 
There's a couple more designs to show you but I'll leave those for a little later in the week.

Cherrio until next time .....

Wednesday, 27 June 2018

Feeling hot hot hot!! ........

Happy Wednesday .....

What another glorious day its been ..... the sun just keeps on shining! I'm loving it!
No BBQ tonight though ..... hubby is out on a business thing, schmoozing with a client.  Which translates to ...... a fancy meal, a few drinks and the football probably!  So I thought I'd take the opportunity to catch up with you guys.

Did anyone see Lucy on the TV this afternoon ..... Sweet Poppy Stencils were back on our screens with the start of their new festive designs.  It's been hard to think of Christmas with the temperatures soaring ..... my craft room has been a little on the warm side!
I did get a few samples for the show done though.  Luckily I made a start before we went away so all that was needed was to finish them off and get them in the post! ..... Ho! Ho! Ho!


There was brand new Christmas stencil designs, some with matching Buddy Dies and a fabulous set of nesting tag dies.  They all went down really well ..... lots of sell outs, so we're not the only ones thinking of Christmas!

Here's a quick look at what I did with some of them ..... first up, the pretty Bubble Wreath


This is gorgeous, a great size, perfect for CAS designs.  Use your inks with it, or the pastes.  Add glitters like I've done above, or use gem stones or sequins to embellish.

I kept my design really simple.  I found a piece of cardstock in my bit box, that I'd smooshed and splattered with gold and silver metallic inks, to use as my background


I then used the stencil with the glossy white paste and sprinkled fine glitters over the top whilst the paste was still wet ......


I die cut out the centre of the wreath, stamped my sentiment onto the circle and then used foam pads and a circle of gold mirri card to mount it back into place


The wreath is great for making matching tags too ..... you don't have to use the full image all the time


If you don't like the multi coloured look then just go with the one ......


Classic gold on black with a touch of festive red ......


I also used a few dots of Liquid Pearls here and there to add a bit more colour.

The Starry Night Tree is another gorgeous new design ..... quite contemporary I think


I've used the metallic inks again to create the background ...... simply splattered them over a piece of white card


Glossy White paste through the stencil, and glitter again over the top .... so quick and easy


A simple sentiment and a few dots of glitter glue .....


and a matching tag ......


Next up is the pretty Large Bauble, which has a lovely set of matching nesting dies ......


I used both the stencil, with inks and paste and glitter ......


And the set of dies, to cut out the large bauble and the bow .....


A festive sentiment and a little bit of Distress Ink around the edges and you have another beautiful Christmas design


Again .... if you like the more traditional colours, stick with the red and gold ..... and just because it's a large bauble doesn't mean you have to make large cards ...... this one is only 7 x 5 inches


Finally ...... we have the Christmas Cracker, which also has matching dies.  This is such a fun design.


I masked off the actual cracker and just did the stars first onto the background using gold paste


I then stenciled the cracker onto a separate piece of card using the white paste and glitters, and used the dies to cut out both pieces


These were then attached to my card front leaving a small gap in the middle so that I could add my greeting .....


I think this would make a fabulous festive party invite .... don't you?

Have you started your Christmas cards yet? If not I hope I've given you some ideas.

Thanks for popping by ...... enjoy the rest of your evening.
It looks like we're in for another beautiful sunset tonight .......... this was from the other evening. 
I can get used to this


Time for a cheeky glass of wine I think and some catch up TV ..... I've earned it!

Cheerio until next time ......