Tuesday, 15 February 2022

CAS Mix Up Challenge ...........

Happy Tuesday ........

Belated Happy Valentine's too 💕 ....... I hope you had a nice day!

It's the middle of February, so that means we're half way through this month's CAS Mix Up Challenge

It's a Mixed Media challenge this month.  Susan's our host, and she's chosen Faux Cloisonne as the theme .......


If you're thinking ...... what's faux cloisonne? (like I did) then don't worry .......

 Susan's Message
For my challenge I would like you to recycle glossy Magazines, Advertising material or you could use Designer Paper that has been hiding in your stash.  Most cards I have seen are embossed with Gold embossing powder but you could use other colours too. 
 
You can also check out the CAS Mix Up Blog,  where you'll find links to some videos showing how to use this technique.

Now I don't buy that many glossy magazines so, I had to really look hard for something to use.  In the end I found a couple of pages in one of our motorhome club magazines.

The next problem I had was deciding on which stamp to use.   Before I ran out of magazine pictures to use (it's not often I throw things in the bin but, boy was this a challenge!!) ..... here's one that survived the cut

(Faux Cloisonne, Stamping,  & Watercolouring)

I stamped my image onto white card, watercoloured the little bunny and the background,


and then used the faux cloisonne technique for the bunny's umbrella.   
Stamped the umbrella part onto my magazine page, heat embossed in gold and fussy cut.  I then paper pieced the umbrella onto the stamped image ...... 


A simple, fun technique, and a great way of adding extra colour to your designs.  I will definitely be using the faux cloisonne technique again ...... I just need to get my hands on some glossy mags!!

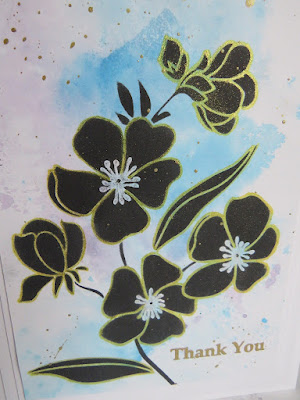
Another way of doing Faux Cloisonne is to use pearlescent paints with your gold embossing
(check out the link to the Lindsey Weirich video on the CAS Mix Up Blog)
Here's my take on that .......

(Faux Cloisonne, Stamping, Heat Embossing, & Ink Splattering)

Black card stock, and a pretty Altenew stamp ....... love it!


Go on ..... why not give it a go and join in with this month's challenge. 
You have until the 24th of the month to get your entries in.  Just remember to include the Challenge Theme, Rubber Stamping, and at least one other Mixed Media technique on your entry.

Happy stamping!

Thanks for popping by ...... enjoy the rest of your day.

Cheerio until next time ........


Supplies
Card 1
Stamps: All weather Friends (Anita Jeram - Colorado Craft Co.)
Inks: Versafine Clair - Nocturne; Delicata Metallic Ink - Golden Glitz; Versamark; Distress Inks to watercolour with 
Others: Gold Embossing Powder (WOW!); ZIG Markers to Watercolour with; Magazine page

Card 2
Stamps: Everlasting Happiness (Altenew)
Inks: Versamark ink; 
Others: Gold Embossing Powder (WOW!); Pearlescent Paints

Saturday, 12 February 2022

Sweet Poppy fans ........ a date for your diary

Happy weekend .........

This week has flown by, again.  Can you believe we're almost half way through February already!
Mind you we've been booking holidays this week, so our year is planned up until August!!  
We're detemined to make good use of the van this year ...... nothing too far afield though, I'm not brave enough to venture over seas yet, well apart from the Irish one that is!  
So far we've got a trip in March, that includes the service on the van that should have been done back in December but we had to cancel because we couldn't get off the island due to the weather!
We're doing a long weekend on one of the campsites on the island, and we've booked two weeks travelling around Scotland ...... looking forward to that!  
We're off to a festival in somewhere called Walesby Forest ...... it's through one of the motorhome clubs we're members of, and we're finishing that trip down to the Cotswolds again for a few days.  
And we're also doing a week on the Norfolk Broads again in May with the family, not in the van for that one of course, we've booked a boat!!
We're making sure that our 2022 is the year of the van!!
  
For now though, I'm having fun with the new release from Sweet Poppy Stencils
Lucy is back on the TV for the first time this year with lots from the new release so, I've been busy making samples for the shows.  If you love your Sweet Poppy designs you might want to make a note in your diary ........ two shows, on Friday 18th February, at 9am and 1pm.

One of the new designs on air will be the beautiful new Lotus Flowers ........ a really pretty, large, stencil design that can be used in so many ways ......


Here I've used the whole stencil, with Distress Oxide inks onto black card, and then added some extra detail to the petals using coloured pencils .......


I do love the Oxide inks on black card, and the matt finish looks fab ...... I just wish I could photograph black card better!!

I added extra flowers to the bottom and side to fill in the open spaces, and finished off the card with a few gold ink splatters to tie in with the gold embossed sentiment .......


Here's the same stencil again only this time, I've used Distress Oxides onto white cardstock ........


I used the inks through the stencil, outlined the design with a black fine liner and then fussy cut around the flowers .......


I do love how the Oxide inks blend so beautifully.
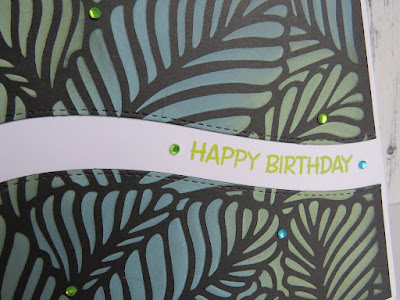
You can also see the brand new Tropical Back Plate stencil ........ a lovely large design perfect for backgrounds, but also just a pretty on it's own .......


Oxides again onto black card ...... love this look, and it's such a simple design.
I used the whole stencil, die cut it into two, and attached it to my cardfront leaving a space for my sentiment ...... great for a guy don't you think!


Here's one more design using the gorgeous Lotus Flowers ........ 


Using just part of the stencil this time in the centre of my card.  Distress inks, blended using stencil brushes and then framed with another beautiful new Sweet Poppy design ....... the Lace Aperture Square, how pretty is this, and such a great size too!  Looks great in the black, but just wait until you see it used with colours! 
There's so many gorgeous new stencils this release and they all work perfectly together!

Don't forget,  Lucy's on our screens on Friday 18th February at 9am and 1pm.


Or ...... if you really can't wait that long, check out the Sweet Poppy website, you'll find the whole new release on there.

Thanks for popping by ...... enjoy the rest of your weekend.
I'm hoping to have a play with this little baby tomorrow .........  the new Big Shot Switch


A little early birthday treat for me.  
And as Valentine's Day is just around the corner and I haven't made hubby a card yet (shhhh don't tell him!) it's a good excuse to have a play!

Cheerio until next time ........


Supplies
Stencils: Lotus Flowers, Tropical BackPlate, Lace Aperture - Square (Sweet Poppy Stencils)
Inks: Distress Oxide Inks - Spun Sugar, Kitsch Flamingo, Shabby Shutters, Mowed Lawn (first card), Kitsch Flamingo, Picked Raspberry, Wilted Violet, Peeled Paint, Mowed Lawn (second card), Shabby Shutters, Twisted Citron for the Tropical background; Versamark ink; Delicata Metallic ink - Golden Glitz; Versafine Clair - Nocturne; Distress Inks - Mustard Seed, Speiced Marmalade, Carved Pumpkin, Mowed Lawn
Stamps: 
Others: Gold Embossing Powder (WOW!); Black Fine Liner;

Sunday, 6 February 2022

Quick and easy cards using Sweet Poppy Stencils new release ........

Happy Sunday to you ......

I hope you're enjoying your weekend. 
It's been a real blustery week here on the island ...... blowing a right old hoolie most days!  Luckily it's been a quiet week for us so, I've spent most of it cosy and warm, in the craft room.

I mentioned last weekend that Sweet Poppy Stencils have had their first new release of 2022 this week.  Brand new stencil designs and gorgeous new stamps ...... if you love your florals then this new collection might just be a must have!  If you haven't seen it yet then check out the New Products section on the Sweet Poppy website, everything is on there, and a bit of a heads up, Lucy will be on the TV with the new release on the 18th of February I think it is.  I'll keep you posted on that one.

If you do love your Sweet Poppy florals, then the gorgeous new Oriental Cherry Blossom might just be for you.  It's a nice big stencil, with so many possibilities.  Just think of all the pretty colours you could use but, it also looks fab when you keep things nice and simple


A smooshed background using Distress inks ....... I think this was actually a clean up piece, which I found in my bit box!  I simply stenciled the design over the top with black Versafine Clair ink (Nocturne), applied with a sponge, building the depth and intensity of colour up gradually.


Once the ink was dry, I used sparkly gel pens to add some highlights ...... gold to draw around the flower heads and silver for the centres.  The sparkle is so hard to catch on camera but trust me, it's there.


A few splatters of gold paint onto the background ......


and a simple heat embossed sentiment to finish it off .....


If you like a more elegant, clean and simple look then this stencil is perfect ......


Stenciled with a grey ink, using a brush this time for a softer look, and I took the image off the edge just a touch.  Even though it's a large stencil, you don't always have to use all of the design.
  
I added some shading to the flowers with a coloured pencil, and detail to the centres using a gold gel pen


Heat embossed the sentiment in gold,  and splattered with gold and silver inks to finish off.


Don't just keep your stencils for the front of your cards ...... make the insides pretty too!


That's just one of the new release stencils, I'll be back to show you some more soon.

Thanks for popping by ..... enjoy what's left of the weekend.

Cheerio until next time .....


Supplies
Stencils: Oriental; Cherry Blossom (Sweet Poppy Stencils)
Stamps: Sentiments from Sweet Poppy Stencils A5 stamp sets 
Inks: Distress Inks for smooshed background; Versafine Clair - Nocturne; Archival Ink - Shadow Grey; Delicata Metallic inks - Silvery Shimmer, Golden Glitz
Others: Gold and Silver sparkly gel pens, Versamark ink; Gold embossing powder (WOW!); Grey Polychromo pencil (Faber Castel)

Friday, 4 February 2022

Wishing Uniko a Happy 10th Birthday ........

Happy Friday ........

I hope you've had a great week.  Any plans for the weekend?  It's looking like a quiet one here, thank goodness!

I am celebrating another birthday though ...... 


Uniko is 10 years old this month ....... WOW!!!  

Happy Birthday Bev and the team!

In true Uniko style, celebrations are going on for the whole month of February, so check out the Uniko Blog for all the details, and maybe even join in the birthday fun.

If you've been following my blog for a while you'll know that I had an amazing two years on the Uniko Design Team, as one of their Brand Ambassadors.  It was so much fun, working with the Uniko range of  stamps, and stencils.
You can imagine how thrilled I was when Bev asked me if I would like to join in the 10th Birthday Celebrations, along with other past DT members, for a fun feature on the blog during their birthday month.  
Of course I said yes! so today it's me on the Uniko Studio Blog for the CASE Yourself feature.

The task was ....... to choose a favourite make from my time on the DT (hmmmm .....not an easy decision), and then CASE it using a newer Uniko product.

It took a while but,  in the end I chose this one ......


A pretty all over design, made for Uniko's Birthday back in 2020 ...... it was the colours in this one that caught my eye.

I do love an all over design, quick and easy when it's just a single stamp but,  it's a look that is so easy to do with individual stamps.  Florals work extremely well .......the ones I used for the card above are from the stamp set Kindness Blooms

However ....... I did go for the easy way for my CASE'd card .......


I decided on the same colour combo, florals again, and of course that pretty all over look.

The border around the edge gives it a real clean, and up to date look I think.  I did this by using low tack masking tape around the edges of my card, BEFORE I did any inking or stamping.

With the tape in place, I used a blending brush to apply a little Distress Ink around the edges of the tape, just to define the frame a little


The floral design is the pretty Background Blocks stamp - Layered Modern Floral  A lovely background stamp that I've actually stamped twice, to fill the card ....... masking tape still in place by the way!  
I used Distress Oxide ink for the flowers, and my MISTI, so that I could build up the depth of colour.

The leaves are also from the same stamp set and are cleverly laid out so that when you position the stamp correctly, all the leaves are in the perfect places ....... clever or what!


I finished off with a sentiment, stamped on a simple die cut circle, just to make it stand out a little. I also added a few gems here and there for a touch of birthday sparkle!


Once everything was finished, I carefully removed the masking tape from around the edges and Voila! .... one framed piece.
I really love how this turned out, and just think of all the different colour combinations that could be done, the possibilities are endless.

Thanks again to Bev and the team ..... it's an honour to be part of your 10th Birthday celebrations.
Congratualtions on such a fabulous milestone ....... here's to the next 10 years.

Thanks for popping by ...... enjoy the rest of your day and have a great weekend.
Why not join in the birthday celebrations too!

Cheerio until next time ......


Supplies
Stamps: Layered Modern Floral,
Inks: Distress Ink - Squeezed Lemonade; Distress Oxide Ink - Salvaged Patina, Squeezed Lemonade (for the sentiment) Versafine Clair - Nocturne; 
Other: Self adhesive gemstones; Small stiched circle die; Low Tack Masking Tape

Tuesday, 1 February 2022

CAS Mix Up Challenge ........

Happy Tuesday .........

Well, that's January done and dusted ......... welcome to February!

A new month means a new challenge from CAS Mix Up.  
I have to say, February's theme is another first for me ....... I do love a good challenge and I'm alswyas happy to try a new technique!   

Chosen by Susan, our host for this month, the theme is ..... Faux Cloisonne. 
Hmmmm ...... sounds interesting.


If it's all new to you too, then check out the CAS Mix Up Blog.  On there there's a lovely message from Susan explaining a little bit about the technique, and you'll also find links to some great video tutorials too.  I watched them all before I made a start! 

So, according to Wiki, Cloisonne is ....... an ancient technique for decorating metalwork objects with colored material held in place or separated by metal strips or wire, normally of gold.

One of the craft worlds ways of achieving this look is to use glossy magazines, or patterned papers, along with gold heat embossing ...... sounds good to me.  
I'm all for recycling although, glossy magazines are not something I buy these days.  The only magazines I have are my journaling/craft mags., and I'm not cutting into those!  
I did however find a copy of one of our motorhome magazines which was perfect.


I stamped and heat embossed my butterflies onto the magazine page ........ being careful not to have the heat tool too hot!


I then fussy cut around the butterflies ...... I do love the finished look.  Ansd what a great, quick and easy way of adding colour to stamped images.

I arranged the butterflies on a piece of navy cardstock and once I was happy with the layout I stamped and heat embossed just butterfly antennae ........ this saves having to fussy cut around them, far to fiddly for me!

I attached the 'cloisonne' pieces over the top, added a sentiment and a few gold ink splatters.


To finish off, I heat embossed the top and bottom edges of the card, using an embossing pen and a ruler to get the straight edge.

I really enjoyed playing with this technique, I hope you give it a try too.

Thanks for popping by ...... enjoy the rest of your day.

Cheerio until next time .......


Supplies:
Stamps: Bigz - Butterfly 2 (Inkylicious); Everlasting Happiness (Altenew) for the sentiment
Inks: Versamark ink; Delicata - Golden Glitz for the splatters
Other: Old magazine page; Gold Embossing Powder (WOW!); Embossing Pen (WOW!)